Professional Grade: Print-Ready Checklist
Tips to Help Ensure that Your Print Order Goes Through with Minimal Hiccups.
BY FOLDERPRINTERS WRITERS
April 12, 2024
You’re finally satisfied with the design and feel that it is now ready to be printed professionally. In this digital, plug-and-play era, it would be easy to assume that all you need to do is create the design then transmit your artwork to your printer.
However, in this also myriad-of-options-and-tech era, it isn’t that simple. Especially if you want your print order to be completed with nary a (or at least, minimal) glitch.
While there are any number of factors that can help a smooth ordering process, there are a few that are easily within your control.
In this article, we’ll provide a checklist which you can follow and check against.
As a leading printer of
custom presentation folders, issues relating to the following list are what we most encounter, which leads us to label them as bare minimum requirements.
Mainly because any mistake or omission of these items in your submitted art file setup and package cannot be manipulated by the printing company without the possibility of drastically veering from your
design and how you’ve been viewing them on your screen, thus delaying (or worse, completely stopping) your order.
CORRECT SPECIFICATIONS
Perhaps the biggest roadblock or outright non-starter would be to send a file that is not completely congruent with the price quote that your printer submitted.
For this reason, you should always make sure that specifications on your artwork match what is detailed on the printer's proposal. This would include items such as size, page count, configuration, number of ink colors, etc.
 Adobe and the Adobe logo are trademarks of Adobe Inc.
ACCEPTABLE FILE FORMAT
Your art-file woudln't be of much use if it cannnot be opened any your printer. Desktop publishing, page layout design or image editing software applications offered by
Adobe Inc. are universally employed by commercial printing companies.
Other options include online editors such as
Canva.com.
 Canva logo is a trademark of Canva US, Inc.
You would therefore do well to create your designs using them.
If, for some reason, you do not have access to any of these tools, a last resort would be to save your files as high-quality printable PDF.
CMYK COLOR MODEL
The image on your electronic screen are rendered in RGB (Red, Green, Blue) color model; printing presses use cyan, magenta, yellow and black inks. For this reason, you should create and save your files in the
CMYK format.
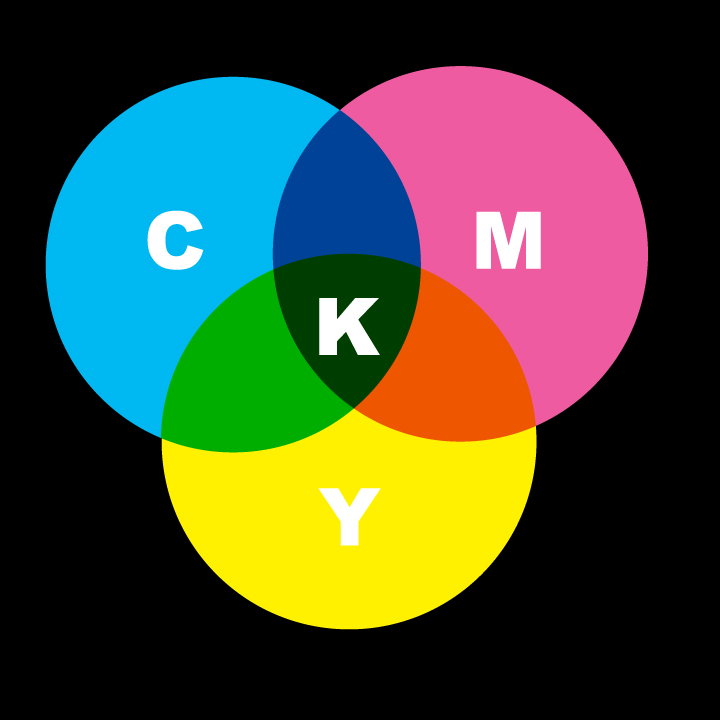 CMYK Color Model
Although the colors as you see them on your screen will never appear exactly the same as ink on paper, you will at least get a better idea of the final product as the color variance between the two mediums will not come as a total shock.
FONT FILES
Most reputable printers have a large font library. Even so, there may be instances in which your printer does not have the typeface you used. Or they do have it but not in the style or weight (e.g., italic, extra-bold) that you specified in your design.
To ensure that not a single character on your document appears incorrectly it would be wise to send the font files. Either in True Type (TTF) or Open Type (OTF) format.
If you are unable to include font files, you could opt to convert your text into outlined fonts. This does not mean that an outline is simply created around each character; rather, they become geometric figures as opposed to editable typefaces.
By being so, they are no longer dependent upon the supporting font software for rendering, and therefore cannot appear any differently.
An overly simplistic way of explaining this concept is that the characters have now become drawings. But therein lies the caveat: it will be tougher to edit typographical errors.
HIGH RESOLUTION
Unless you want your pictures to appear pixelated, you should make sure that all raster images used are at 300dpi — at the size they are used in the design.
That is to say a 300dpi image that is two inches wouldn’t work if it is designed to be printed at seven inches.
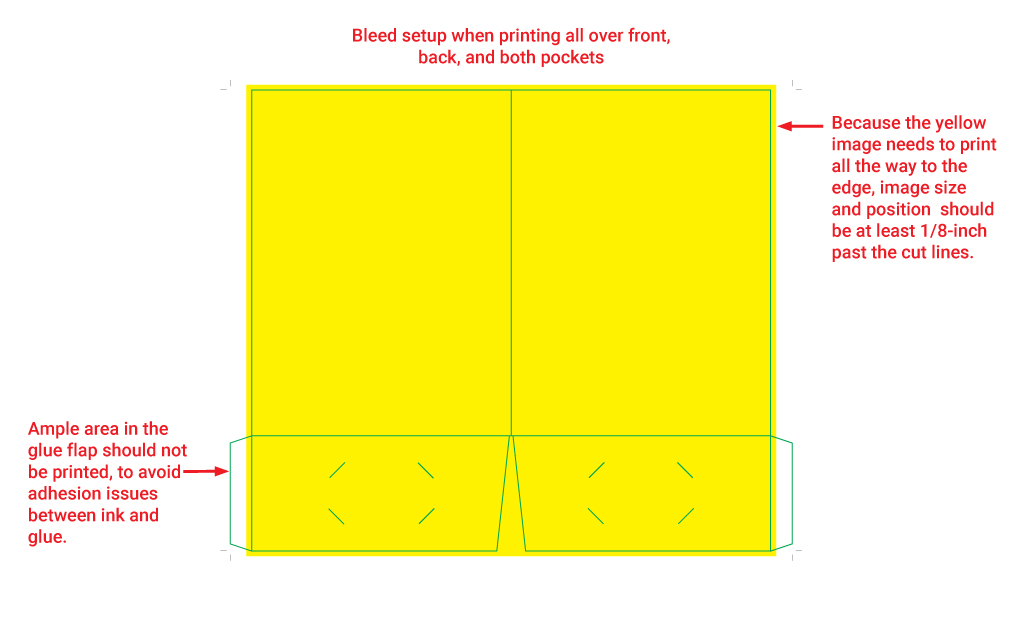
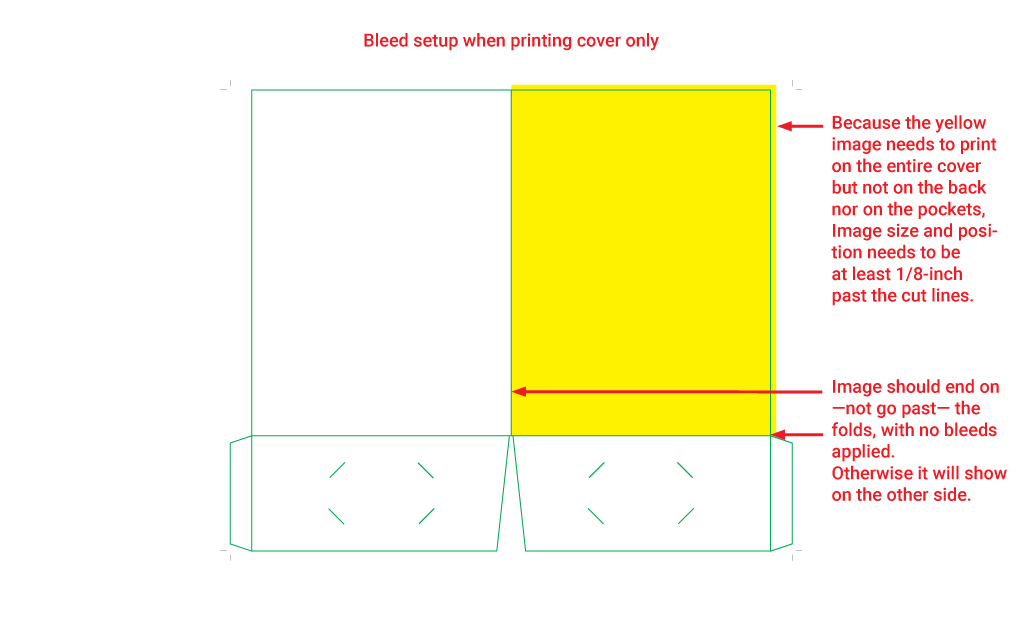
BLEED
For any graphic element that you designed to be completely flush to the outer edge of any page, you should position it such that it goes past (
bleeds over) the cutting line by at least one-eight of an inch.
Otherwise, if your art file has the image ending right at the edge (therefore not over the cutting line), a thin white line will appear after it is cut by an industrial guillotine paper cutter.
That white line, by the way, is the surface of the paper that was not covered by ink.
SPECIAL FINISHES AND EMBELISHMENTS
If your design calls for any special finishes or embellishments, particularly those to be applied only to specific elements or areas such as foil stamping, it is best to clearly indicate that location and dimensions of their application.
Ideally, you should also create a mask or outline of the images. This will greatly reduce any confusion on the part of the printer.
CONCLUSION
To be sure, there are a host of other factors that may contribute to the any delay or mistake in the processing of your print order; but as mentioned earlier,
the items listed above are the bare minimum with regard to actions you can take to help ensure that your printed piece comes out right, as you designed and envisioned.
These will also help eliminate or reduce any back and forth with your printer asking for this and that item.